
This Is How You Keep Aphids and Spider Mites Away from Your Tradescantias

In my last two newsletters, I talked about dealing with thrips and fungus gnats, sharing my best tips to keep them under control. But as you probably know, thrips and fungus gnats aren’t the only pests that can cause issues for your Tradescantias. In my experience, thrips are the most common, but that doesn’t mean we should forget about the others pests out there.
This time, I want to talk about some other common pests that can create problems for your plants. In this newsletter, I’ll walk you through how to identify, prevent, and treat infestations of aphids, spider mites, mealybugs, and whiteflies. These tips will help keep your Tradescantias healthy and looking their best.
Let’s get started!
First off, regardless of the type of pest, it’s always good to consider and think about the following:
Plants near the affected plant should also be placed in quarantine or kept under observation. Continuous observation is important, both as a preventive measure and during and after treatment, to make sure that pests do not return.
Since Tradescantias are fast-growing and easy to propagate from cuttings, it’s worth considering taking only one or a few cuttings from the least affected parts. This approach makes treatment easier than trying to save an entire heavily infested plant. Once the pests are gone, these cuttings can quickly grow into healthy, full plants again.
If you consider using beneficial bugs, it’s important to do your research on which type to get, as there are many different kinds that target different types of pests.
Aphids:
Aphids are small, soft-bodied insects that can come in various colors, including green, black, brown, and white, and are often found clustering on new growth and the undersides of leaves. Here’s how to identify and deal with them:
How to Identify Aphids:
Appearance: Aphids are tiny, usually 2-3 millimeters in length. They can be green, black, brown, or white, depending on the species.
Signs of Infestation: Look for clusters of these tiny insects on new growth and the undersides of leaves. One of the first signs of an infestation is the presence of white skins shed by the aphids, often found on the leaves below. You might also notice something sticky on the leaves and stems—that’s their droppings, called honeydew, which can attract spores of sooty mold.
Damage: Aphids feed by sucking sap from the plant, causing distorted and stunted growth. Leaves may curl, yellow, or drop off. When a plant becomes heavily infested, the aphids develop wings and fly off to colonize new plants.

How to Get Rid of Aphids:
Manual Removal: If the infestation is small, you can remove aphids by hand or spray the plant with a strong stream of water to dislodge them.
Insecticidal Soap: Spray the affected plants with insecticidal soap or a homemade solution of soap and water (1 part soap to 10 parts water), which is effective at killing aphids without harming your plants.
Natural Predators: Another option is to introduce beneficial insects, which are natural predators of aphids and can help keep their population in check.
Observation and Quarantine: Keep your plant under observation and in quarantine until you’re sure the aphids are gone.
Spider Mites:
Spider mites are tiny arachnids that often are difficult to see, but the damage they cause is quite noticeable. Here’s how to identify and deal with them:
How to Identify Spider Mites:
Appearance: Spider mites are extremely small, usually less than 1 millimeter in length, and can be red, brown, or green. You might need a magnifying glass to see them clearly.
Signs of Infestation: The first signs of spider mites are usually seen on the outer leaves, which develop tiny, light-colored spots or speckles where the mites have sucked out the plant’s sap. As the infestation progresses, the leaves may look dusty and eventually wilt. Up close, you can see fine webbing that connects different parts of the plant, along with the mites’ empty, shed skins and eggs in a thin, white film.
Damage: Spider mites feed by piercing plant cells and sucking out the contents, causing leaves to become speckled with yellow spots and eventually turn brown and fall off. The tiny mites mostly live on the undersides of leaves. A heavy infestation can cause the plant to look dusty and unhealthy.

How to Get Rid of Spider Mites:
Manual Removal: For small infestations, spraying the plant with a strong stream of water can help dislodge the mites. Focus on the undersides of the leaves where the mites are most likely to be found.
Insecticidal Soap: Spray the affected plants with insecticidal soap or a homemade solution of soap and water (1 part soap to 10 parts water). This is effective at killing spider mites without harming your plants. Be sure to cover all surfaces, including the undersides of leaves.
Natural Predators: Introduce beneficial insects, which feed on spider mites and can help control their population.
Humidity: Spider mites thrive in dry conditions, so increasing the humidity around your plants can help deter them. Use trays with water or a humidifier to make the environment less favorable for spider mites.
Observation and Quarantine: As always, keep the plant isolated and under observation. Spider mites have a development time of 10-20 days, so it’s important to repeat the treatment as necessary.
Mealybugs:
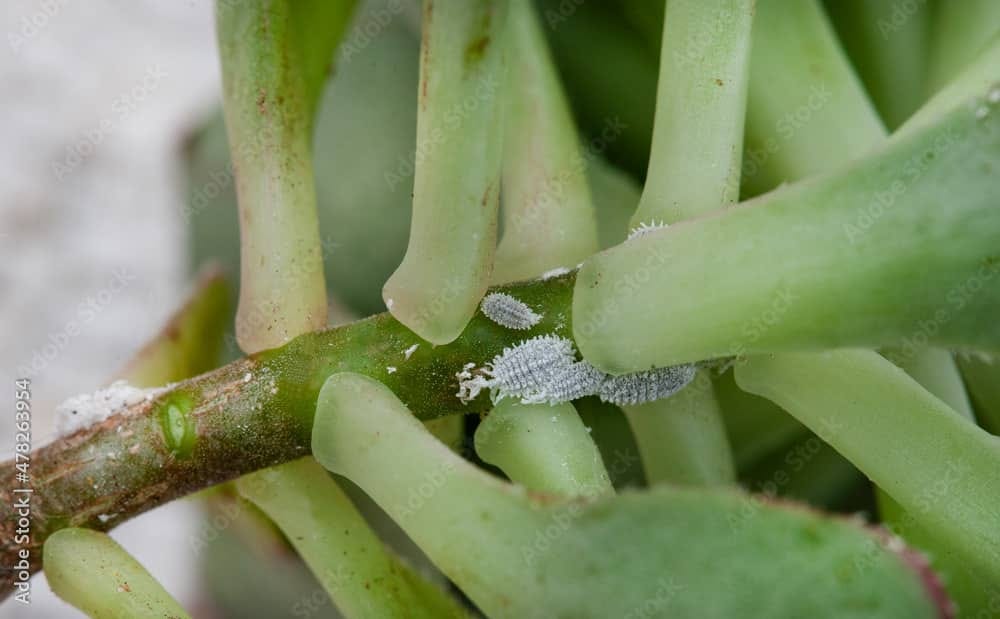
Mealybugs are small, white, cotton-like insects. They often cluster in leaf joints and on stems, where they suck sap from the plant.
How to Identify Mealybugs:
Appearance: Mealybugs are tiny, usually 1-4 millimeters in length, and covered with a white, waxy, cotton-like substance.
Signs of Infestation: An infestation often starts on the newest leaves at the top of the plant where they prefer to lay their eggs, but it can also begin lower down. Mealybugs almost always sit on the undersides of the leaves, making them harder to spot initially. This often delays the visible signs of an infestation on the plant. Look for white, cotton-like clumps on leaves, stems, and in leaf joints. You might also notice sticky honeydew on the leaves and stems, which can attract ants and lead to sooty mold. Even though the affected plant suffers from the mealybugs sucking its sap, the biggest problem is often the sooty mold that grows on and around the honeydew. This creates a grayish-black, sticky coating on the leaves.
Damage: Mealybugs feed by sucking sap from the plant, causing yellowing, wilting, and leaf drop. Heavy infestations can severely weaken the plant.
How to Get Rid of Mealybugs:
Manual Removal: Use a cotton swab dipped in rubbing alcohol to remove mealybugs from the plant.
Insecticidal Soap: Spray the affected plants with insecticidal soap or a homemade solution of soap and water (1 part soap to 10 parts water). Make sure to spray directly on all the bugs, including adults, larvae, and eggs. Spray thoroughly on the undersides of all leaves and all new growth tips.
Natural Predators: Introduce beneficial insect, which feed on mealybugs and can help control their population.
Remove Heavily Infested Leaves: It’s a good idea to remove heavily infested leaves that are full of eggs and larvae.
Observation and Quarantine: Keep the plant isolated and under observation until you’re sure the mealybugs are gone. Repeat the treatment after a couple of weeks to ensure all mealybugs are eliminated.
Whiteflies:
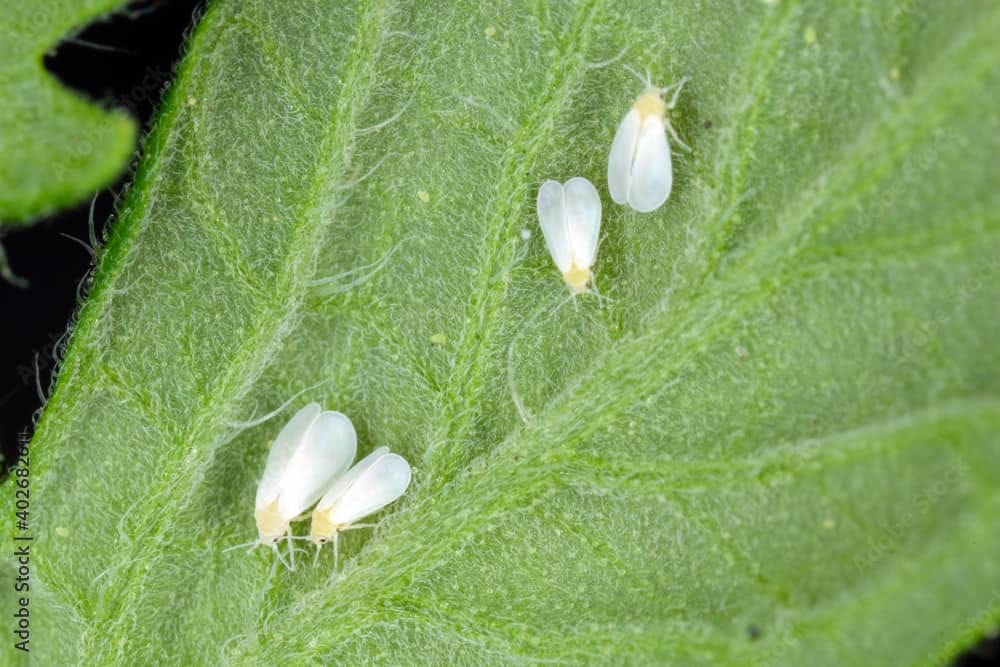
Whiteflies are small, white, moth-like insects that can be found on the undersides of leaves.
How to Identify Whiteflies:
Appearance: Whiteflies are tiny, about 1-2 millimeters in length, with white, powdery wings that make them look like miniature moths.
Signs of Infestation: Look for small white insects flying around the plant when it is disturbed. They often gather on the undersides of leaves where they lay their eggs. The larvae and pupae stages are also found on the undersides of leaves, appearing as small, flat, and oval-shaped scales.
Damage: Whiteflies feed by sucking sap from the plant, causing yellowing, wilting, and leaf drop. Heavy infestations can severely weaken the plant. They also secrete honeydew, which can lead to the growth of sooty mold on the leaves.
How to Get Rid of Whiteflies:
Insecticidal Soap: Spray the affected plants with insecticidal soap or a homemade solution of soap and water (1 part soap to 10 parts water). This is effective at killing whiteflies without harming your plants. Be sure to cover all surfaces, including the undersides of leaves.
Yellow Sticky Traps: Place yellow sticky traps near your plants to catch adult whiteflies. The bright yellow color attracts the insects, and they become stuck on the adhesive surface.
Natural Predators: Introduce beneficial insects, which feed on whiteflies and can help control their population.
Remove Heavily Infested Leaves: Prune and dispose of leaves that are heavily infested with eggs and larvae. This helps reduce the whitefly population and prevents further spread.
Repeat Treatments: Whiteflies have a rapid life cycle, so it’s important to repeat treatments every few days to make sure all life stages are targeted. Continue treatments until you no longer see signs of whiteflies.
Wrapping Up
I hope these tips help you keep your Tradescantias free from aphids, spider mites, and mealybugs. But our plant care journey doesn’t end here! In two weeks, I’ll be back with Part 4, where we’ll explore diseases and other issues that can affect your Tradescantias and how to tackle them effectively.
Thank you for reading!
If you haven’t already, make sure to subscribe so you don’t miss out on the next part.
Happy planting, and see you next time!
/Katja